Content
1. Attaching a counter to a new counting site
2. Attaching a counter to an existing counting site
3. Detaching a counter from a counting site
4. Fixing Attach/Detach mistakes
a. Incorrect attachment period (Site History Tab)
b. Missing an attachment record out of chronological order (Site History Tab)
c. Mistakenly attaching a counter to the wrong counting site (Counter History Tab)
Definitions
This guide explains how to manage data from multiple counting sites using a single counter. If you install your mobile counters at different locations, you will need to separate the data into different counting sites in Eco-Visio. Before we continue, it is helpful to clarify some terminology we will refer to in this guide:
- The counter is the physical unit itself, represented by its serial number.
- The counting site is the online representation of where the counter is installed.
- Attaching a counter to a counting site means that the data from the counter is sent and stored on the specific counting site.
- Detaching a counter from a counting site means data from the counter will no longer be sent and stored at the counting site.
- Site History is the window that reflects counting site’s attachment/detachment history (it lists all the counters that were attached to a particular site)
- Counter History is the window that reflects attachment/detachment history of the counting system (it lists all sites the particular counter has ever been attached to)
In Eco-Visio, there are to ways to attach a counter to a counting site: attaching a counter to a new counting site and attaching a counter to an existing counting site. Below you find instructions for both, as well as how to detach a counter from a counting site.
If you make a mistake during the attach/detach process – do not panic! No data will be lost, and Eco-Counter will be able to assist.
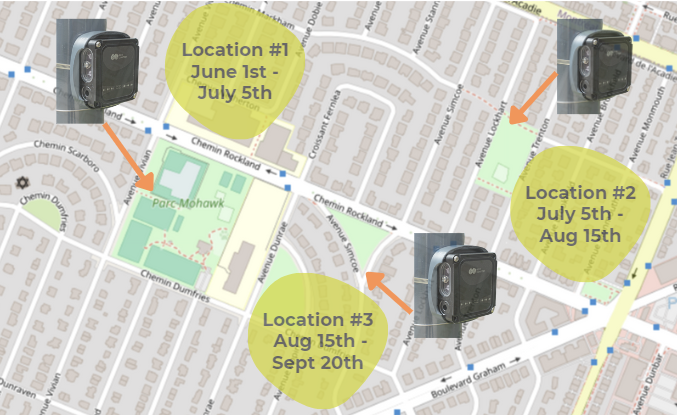
| Note: To minimize errors, attachments/detachments should be done in chronological order. For the example below, the Counter was moved to three different locations during the summer. It is necessary to attach/detach at Location 1 first, Location 2 second, and Location 3 last:
|
Attaching a counter to a new counting site
If you install your mobile counter at a location where you have never counted before, then follow this step to attach the counter to a new counting site.
1. Select the Sites tab under the Counter and Data Management section of the Eco-Visio homepage.
2. At the top of the page click the blue heading, to see your non-attached counters. These are counters that need to be attached to a counting site for you to see the count data. Find the counter serial number which you installed at your new location and select Attach to a new site.
3. Enter the new counting site name and select Next.
Note: Please follow this site name convention: District | Town | Location. Example: D3 | Onamia | Hwy 169 Crossing
4. Select the geographic location by navigating the provided map, inputting an address, or inputting coordinates where the counter was installed and select Next.
5. Rename the counting flows to make them more recognizable. For example, if your counter has direction detection, each direction will have a separate flow (IN or OUT). You can indicate the cardinal direction of the flow by editing the flow name. For example, if the IN counts represented northbound pedestrians, you will label IN as NORTH. When you have finished specifying the flows, select Next.
Note: When you install the counter, it is important to record the cardinal direction that relates to the IN and OUT counts. Use the Installation Form provided at the end of this document to record the direction associated with the IN and OUT counts.
6. Select the attachment date and time for the new counter, then click Save.
Note: The Attachment date is the date when the counter was physically installed at the counting site location.
7. Congratulations! Your counting site has now been created. All data from the counter will now be sent to this counting site until you detach the counter.
8. You can add photos to the site as well by clicking Edit in the Pictures tab on the counting site page.
Attaching a counter to an existing count site
If you install your mobile counter at a location where you have counted before, follow this step to attach a counter to an existing counting site. This is useful if you return to collect counts at a specific site year after year and wish to store all the data on a single counting site.
Note: The Attachment date is the date when the counter was physically installed at the counting site location.
1. Select the Sites tab under the Counter and Data Management section of the Eco-Visio homepage.
2. At the top of the page click the blue heading to see your non-attached counters. These are counters that need to be attached to a count site for you to see the count data. Find the counter serial number which you installed at your location and select Attach to an existing site.
3. Search for the site name, and select the counting site from the list you wish to attach the counter to. This is the site where you have installed the counter. Click confirm
4. Rename the counting flows to make them more recognizable. For example, if your counter has direction detection, each direction will have a separate flow (IN or OUT). You can indicate the cardinal direction of the flow by editing the flow name. For example, if the IN counts represented northbound pedestrians, you will label IN as NORTH. When you have finished specifying the flows, select Next.
Note: When you install the counter, it is important to record the cardinal direction that relates to the IN and OUT counts. Use the Installation Form provided at the end of this document each to record the direction associated with the IN and OUT counts.
5. Select the attachment date and time for the new counter, then click save.
Note: The Attachment date is the date that the counter was physically installed at the counting site location.
6. Congratulations! Your counter has now been attached to an existing counting site. All data from the counter will now be sent to this counting site until you detach the counter.
Detaching a counter from a counting site
Detach the counter from the counting site when the counter is removed from the location and ready to be installed elsewhere. Detaching a counter prevents the data from being sent and stored at the counting site and frees up the counter to be attached elsewhere.
Note:
- The Detachment date is the date on which the counter was physically removed from the old counting site location.
- Detached counters are returned to the “Non-Attached Counters” list at the top of the Sites page.
Steps:
- On the Eco-Visio homepage, click the Sites tab under the Counter and Data Management
- Identify the counting site from the list where the counter was removed, by either searching the site name or serial number
- At the far right of the black bar, click the Detach counter button
- Enter the date/time that the counter was removed from the old location, then click Detach to make the change
- The counter is returned to the “Non Attached Counters” list, ready to be attached elsewhere
Fixing Attach/Detach mistakes
To avoid mistakes, it is important to attach/detach a counter to a counting site in chronological order. However, it is possible to create counting sites out of chronological order if necessary. You can also adjust the attachment/detachment date to fix mistakes as needed.
a. Incorrect attachment period (Site History Tab)
Example: the counter was attached to the counting site on the 1st of July 2024, but it was actually installed at the location on the 5th of July 2024.
Steps:
- To correct an attachment date the counter must be attached to the counting site
- Select the counting site from the list
- Click the “History” tab to the left of the counting site page
- Click the calendar icon
- Select the correct attachment date, then click Validate
Note: Do not overlap attachment time during the attachment date. Remember – the data from the counter can only be at one counting site at a time! Allow at least one hour between the last detachment and the next attachment records.
b. Missing an old attachment record (out of the chronological order)
Example: the counter was attached/detached to counting sites for Location 2 and Location 3. It was then realized that the counter had not been attached/detached to a counting site for Location 1 yet.
Steps:
- Make sure the counting system is free and is under Non-Attached Counters
- Attach the counter to a new counting site for Location 1 (in our example, the site is called “D3 | Onamia | Parc Mohawk”. The attachment date does not matter at this point, so you can choose an arbitrary date (e.g. yesterday’s date).
- Click the “History” tab to the left of the Counting Site page
- Click the calendar icon
- Select the correct attachment date, and detachment date, then click Validate
- The counter will be detached from the counting site and will be moved to the Non-Attached Counters.
- Attach the counter back to its current counting site by removing the Detach date in the history tab.
Note: Do not overlap attachment time during the attachment date. Remember – the data from the counter can only be at one counting site at a time! Allow at least one hour between the last detachment and the next attachment records.
c. Mistakenly attaching a counter to the wrong counting site (Counter History Tab)
Example: the counter shows as attached to location A, but it was actually never attached to the site A and instead installed on a counting site B. Counting site B has no records of the attachment.
Steps:
- So far, we’ve been working with the Site History tab, but this time navigate to the Counter History tab by clicking on the serial number of the counting system that has an incorrect attachment record.
- Click on the ‘History’ tab on the top menu bar. You will see all counting sites the counter in question was ever attached to together with the attachment periods. In this example, our counter was mistakenly attached to the site that is called “D3 | Onamia | Parc Library”
- When hovering over each site record a paper clip icon will appear all the way on the right.
- Click on it to completely remove the wrong attachment record.
- The counter now has no association with any site during that period and can be attached to any other counting site.
Note: Once the record is removed, there is no way to restore the exact dates, so be sure to make a note for yourself if in doubt.
Are you still having trouble with mobile counter management? Get in touch with our support team!